Wednesday, October 12, 2011

From breadboard to pcb (Intro)

While i was exploring the tutorials of arduino i stepped on Fritzing. Fritzing is a program which makes the creation of pcb from breadboard a piece of cake. If it could solder the parts also, then you wouldn't need to do anything. In this part of the guide i'll introduce you to fritzing and the next post will be about the developing and etching of the pcb itself.

In a few words, you install fritzing, place the parts on the breadboard of fritzing and you got your mask for pcb and the schematic of the circuit for easy transfer to Orcad or same programs.
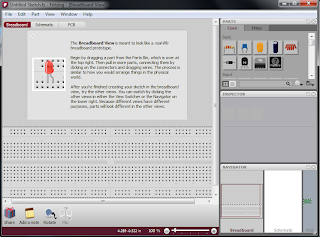
starting screen (2)
You can get fritzing from here. Run it, and you see the screen on your left (img. 2) where you can see an empty breadboard waiting you to place parts. The only thing you have to do is place the parts you do want and everything else is done automatically.

On the top right there is the parts' list fritzing has from the beginning. For start it's ok, but you can add more parts ( i'll discuss that in another post).


Just below the parts' list is the "Inspector" which helps you change the attributes of each part. The last window shows the schematic and the pcb of the circuit you are designing on the breadboard. You can make also modifications but this will not be the subject of this post.

Steps in a hurry:
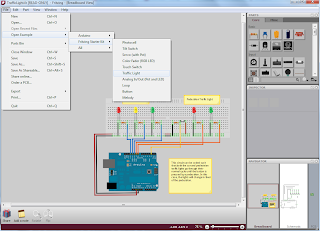
  • Choose what parts you do need form the list, and place them one by one with drag and drop on the breadboard.
  • Change their attributes from the "Inspector" window.
  • Connect two pins with each other by clicking on the one and then drag the mouse until the other pin. The wires don't connect if you cross them.

setting up the breadboard (3)


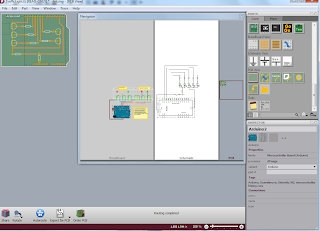
breadboard ready (4)
 Suppose we have already transfer our circuit at fritzing's breadboard. We just want to get the mask in order to make the pcb. Below i have used an example from fritzing the "Traffic Light" which is an arduino dependable (img. 4).


Now choose the pcb view from the "Navigator" on the bottom of the window. You can see that our pcb is ready and it's also on the dimensions of the arduino just like a shield.

Notice that when you select a part on the breadboard it is also selected in all views (pcb and schematic).

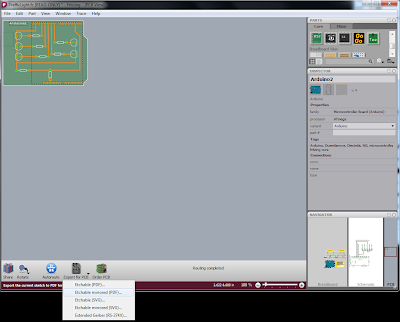
pcb view- ready to export mask (5)
The only thing we have to do is export the mask to pdf and print it.
So: While we are at pcb-view, select the "Export for PCB"  icon and pick an option from the list. Select between pdf or svg format and mirrored or not (img. 6). Otherwise you can go from File -> Export ->for Production. The process is about the photo-resisting method of pcb creation.


exporting the mask (6)

That's all for now. I want to try to integrate fritzing with OrCAD or some other circuit analysis program because fritzing also gives the schematic from a breadboard. At last the process of etching and developing will be the next on the blog.


Monday, October 3, 2011

Arduino got illustrated!

Arduino is a microchip that can be programed through a PC in C language. It is  part of the AVR family. The board that "hosts" Arduino has many inputs and outputs in a way you can easily program it to make basic or complicated things.

There is a guide in comic style that can tell you more in a better way way if you are newbie, check out this pdf from Jody Culkincom.

Sunday, October 2, 2011

Hot-air gun using the soldering iron

soldering iron (1)
This is a simple guide in order to adjust your soldering iron in a way it can be used as a hot-air gun.

The basic things you are going to need are an air-pump, a soldering iron, a copper tube (1/4") and a pen tip. The project is this:
  1. You get a small copper tube about 7cm to 10cm and make a hole at the mid of it or a bit closer to one end. Through this hole you will fix the iron.
  2. On the one end you place the pen tip, something like the one in photo 2.
  3. On the other end there will be the air-pump.
  4. Also you  have to fix all this on the tube.
pen tip (2)
 You can use a broken iron tip so that you can solder it to the copper tube. Solder the pen tip and a junction  hose for the pump. In order to solder them use a blowtorch and the right soldering and not the one you are using with the iron because it will melt as you can imagine.
For the pump you can use an electrical one or even a hand pump. Remember, the pump doesn't need to be very strong so that the air coming through the tip is hot enough.
To be honest i've never used this thing with a hand pump, but i'll try it sooner or later to comment on the procedure.

Good luck and happy soldering!